Lockpicking with Dice
A lockpicking dice game for 2-8 players!
Lock Dice!
As a budding lock maker you have set out to test your designs against your peers. Take your picks and pins and challenge some rivals!
Note:
The game can be played with 2-8 people, but frankly, the bulk of the testing has been done with groups of four.
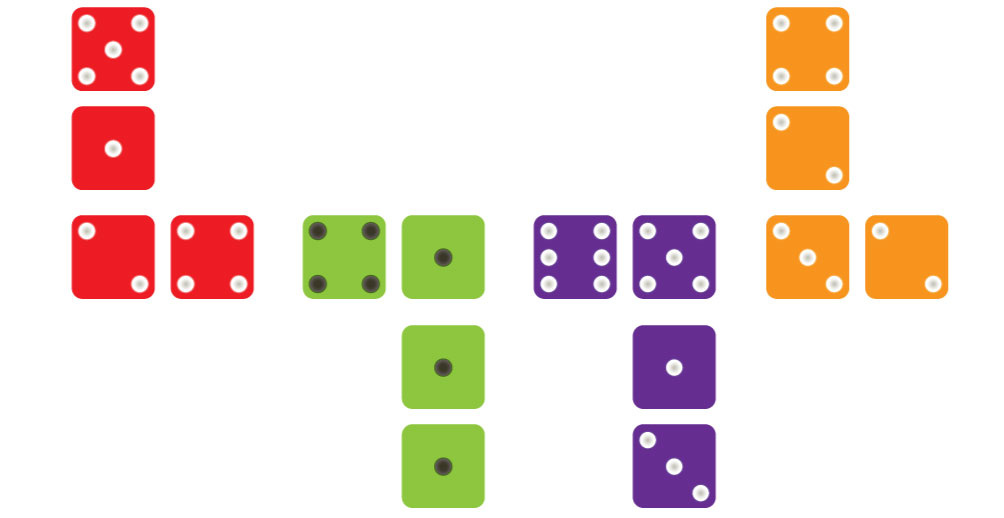
The Dice:
- 2 black dice for tracking your skill & tools
- 1 white die for tracking your experience
- 6 colored dice for lock building
- 6 colored dice for lock picking
Tool Die:
Your tool die starts at 1 and determines how many (adjacent) pins you can work on in each attempt. At level 2, you can work on the first pin and the second pin. At level 4, you can work on the first, second, third and fourth pins. We'll go into detail about how this mechanic works later in the instructions.
Skill Die:
Your skill die starts at 1 and determines how many times you can try to set the same pin. At level 1, you get 1 attempt, at level 6, you get 6 attempts.
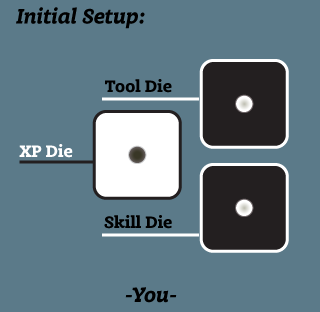
XP Die:
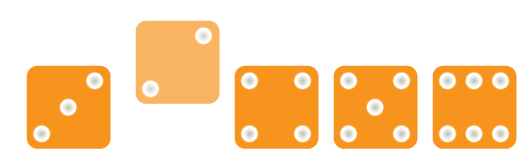
Your XP die starts out of play, with 1 pip showing, sitting to the LEFT of your Tool and Skill dice. The XP die determines when you can increment your Tool and Skill dice.
Your Tool and Skill dice will be positioned next to one another on the table, with one closer to the center and the other closer to you. The Tool die (number of pins) will be furthest from you, the Skill die (number of attempts) will be nearest you.
When you gain XP, you will increase the count on your XP die accordingly and place your XP die to the RIGHT of your Tool and Skill dice indicating it is now in play. If you scored 2XP, it would look like this:
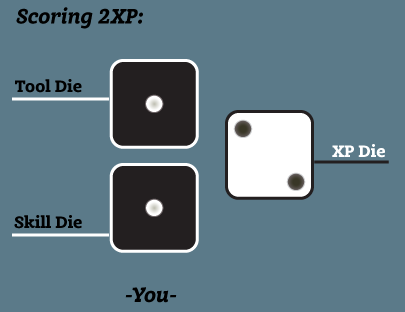
When your XP die hits 6 you can increase the count on either your Skill or Tool dice. The choice is yours, but you can only increase one per cycle of the XP die. Afterward your XP die is again placed to the LEFT of your Tool and Skill dice. Excess XP gained above 6 is not retained. As soon as the XP die hits 6, all additional XP is ignored, the die is moved to the left, and the chosen Tool or Skill die is incremented.
See "Resolving XP" below for details on gaining XP.
Note:
When the XP die is out of play, it is effectively set to "0". When you gain 1 XP, you put it into play with 1 pip showing. If you gained 4 XP while your XP die was out of play, you would put it into play with 4 pips showing.
Examples:
-
Your XP die is at [4], your Tool and Skill dice are both at [1]. After picking an opponents lock, you gain 2 XP, bringing your current total to 6. You increase your Skill rating by 1 to [2], reset your XP die to [1] and place it to the LEFT of your Tool and Skill dice.
-
Your XP die is at 5, your Skill die is at [2] and your Tool die is at 1. After picking an opponents lock, you gain 6XP, bringing your current total to 8. You increase your Tool rating by 1, bringing it up to [2]. Then you reset your XP die to [1] (ignoring the extra 2 XP) and place it to the LEFT of your Tool and Skill dice.
Who Goes First
Put a single die in the center of the table. All together, everyone will roll one of their own dice. Whoever matches the center die will go first. If no one matches the center die, everyone rolls again, together. If more than one person match the center die, those people will roll again, trying to get a 2nd match, and continuing until only 1 person remains.
When player 1 has been determined, remove the die from the center of the table.
Setup
Challenge Lock:
We will be assembling locks by rolling 6 of our colored dice. The first one will be the biggest and is called the Challenge Lock. Each player will contribute some number of dice, depending on the number of players, to the challenge lock.
- 2 Players - each player contributes 3 dice to the Challenge Lock & keeps 3 dice for their own Lock.
- 3-5 players - each player contributes 2 dice to the Challenge Lock & keeps 4 dice for their own Lock.
- 6+ players - each player contributes 1 die to the Challenge Lock & keeps 5 dice for their own Lock.
Starting with Player 1, players will roll their Challenge Lock dice one-by-one and begin placing them in a line. Player 1s dice will always be the first dice in the challenge lock.
Note:
Order is important! The whole game is built around matching dice in order, and thus, all die rolls, including lock building rolls, should be done in order. Whether the dice are geographically separated to determine order, or separated in time (rolling one after the other) just make sure you always know the order of the dice.
Example:
Player One rolls two dice for the challenge lock. Their first die is a [2], followed by a [4] on the second die.

Player Two rolls two dice. A [4] followed by a [1].

Player Three rolls two dice. A [6] followed by a [5]

Player Four rolls two dice. A [3] followed by a [2]

Whenever someone works on the challenge lock they have to work in that exact order.
Note:
We'll want to know who's dice are who's for the next step. Colors help, but sometimes two players will have the same color dice, so it is good practice to separate them on the table by contributor, as we have shown in the example above.
Personal Locks:
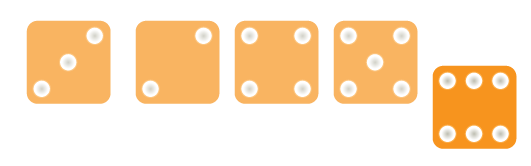
Each player will choose one of their dice that are in the Challenge Lock to build a Personal Lock off of. The Challenge Lock die will always be the first pin in the Personal Lock. The players will take their remaining lock dice (they should have 6 dice total between the Challenge Lock and the Personal Lock), announce which of their Challenge Lock dice they will be building off of, and roll their Personal Lock dice 1 at a time. They will add them, in order, to their selected Challenge Lock die, working perpendicular to the Challenge Lock. The final setup for our 4 players should look something like this:
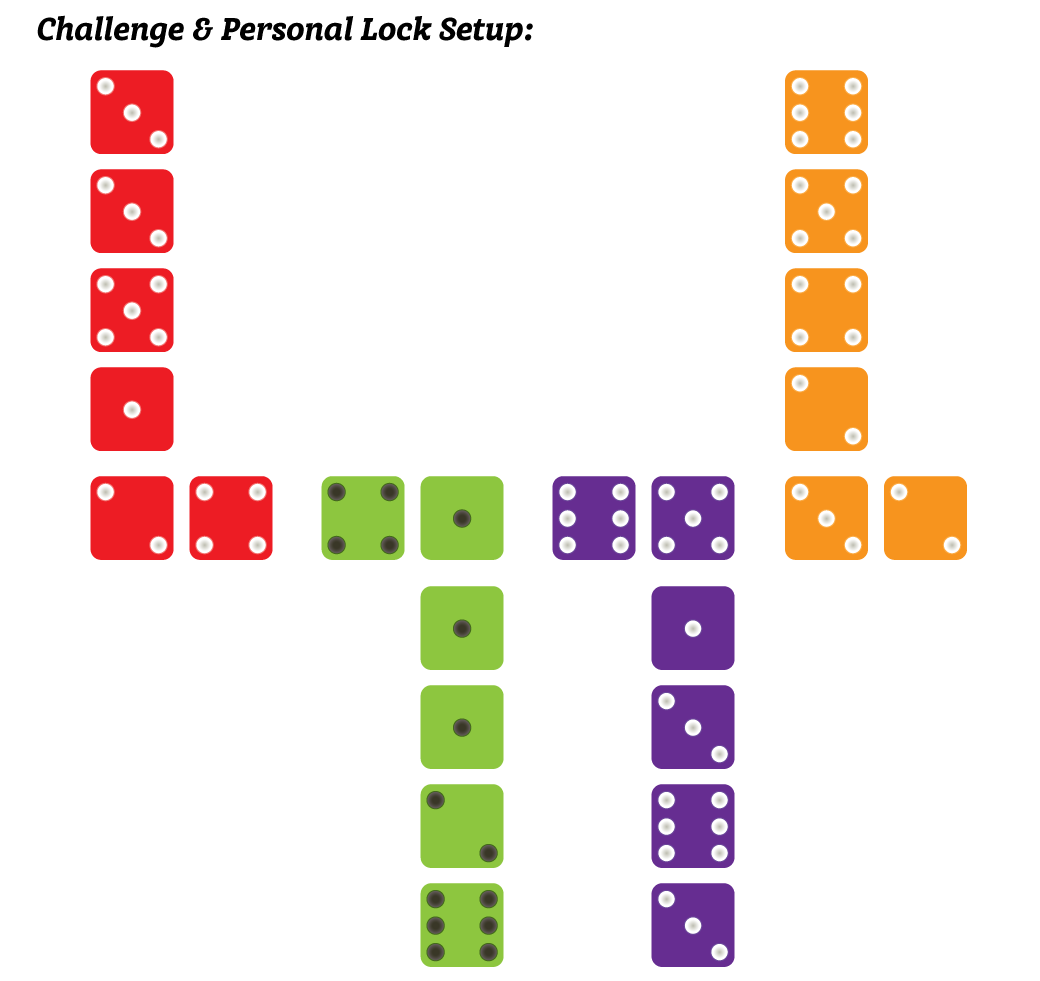
And the pins in their 4 locks will be picked in this order:


...because the Challenge Lock die will always be the first pin in the lock.
Turns
Picking:
In order, players attempt to pick each other's locks.
- Select a lock to work on.
- Roll your pick die attempting to match the first pin (die) in your opponents lock.
- If you get a match repeat step 2 on the next pin in their lock
- If you successfully match every die in the lock, you have opened that lock and will return those dice to their owner
- After failing to match, or successfully opening 1 lock, your turn ends.
XP resolution:
- If you have lost a turn, gain no XP as you are skipped.
- If your lock has been attacked, but wasn't opened, gain 1XP.
- If you have attempted to pick the lock, gain 1XP.
- If you successfully picked 1 or more pins, gain an extra 2XP.
- If you successfully opened a lock, gain an extra 3XP.
The maximum XP you can gain during your own turn is 6. 1 for attempting to pick the lock, 2 for successfully setting any number of pins, and 3 for successfully opening the lock. The maximum XP you can gain during a round depends on the number of players. In our scenario, with 3 players, you could potentially gain 3XP if your lock is unsuccessfully attacked by every rival, and gain another 6 on your own turn by picking the lock of a rival, for 9 points altogether.
Note:
If your XP die hits 6 because your lock survived a rival's attack, you should immediately increment either your Tool or Skill die and move the XP die to the left. If you gain subsequent XP for defending or picking, you can continue to increment the "fresh" die. In this way, you can potentially gain more than one Tool or Skill point in a round. If a round starts with your XP die at 5 and your lock successfully survives at attack, you could increment the Tool or Skill dice, then on your turn, if you successfully open a lock, you gain a full 6 XP and may again increment the Tool or Skill dice.
Picking with Bonuses:
No matter what your Tool and Skill dice read, you will always get to attempt to set 1 pin in your turn. However, there are some rules around how the bonuses play out.
Skill Bonus:
When you start the game, you will only be able to pick until you fail to set a pin (match a number on a die). As you gain skill levels, you can try again after a failure. As soon as you successfully set the first pin in your sequence, your failures reset and you get the full bonus on the next pin you attempt. Here's an example:
I am player 1. Right now my skill die is set to [3]. So, I get 3 tries to set each pin I work on. I'm working on Player 3's Personal Lock that looks like this:
I always have to start with the first pin in the lock, so I'm trying to match the number [5]. I roll my picking die, it comes up:

No good! But, I have 2 more chances before my turn is over. Trying again, I roll:

A match! That pin is set. Because I set the first pin in the sequence, my attempts reset and I get to move "deeper" into the lock. I'm now working on the 2nd pin in the lock, trying to match the number [1]. I roll my picking die and it comes up:

No good! But, because that was my first attempt against this pin, I still have 2 more chances before my turn is over. I roll again:
Augh! 2 again! 1 more chance...

No good! And now that I have failed to set this pin 3 times, I've burned through my available skill bonus and my turn is over. I'll get 1 XP for attempting to pick and 2 more XP for my initial success, and Player 3 will get 1XP for her lock surviving the attack.
Tool Bonus:
When you start the game, you will only be able to pick 1 pin (match a number on a die) at a time. As you gain better tools, you can start working on more pins. The way we determine how many pins you can work on is to count from the first pin in the current sequence. You are always attempting to pick the first unset (unmatched) pin in the lock. If you fail to set that pin, your attempt has failed, even if you successfully set other pins. With better tools, you can work on the first, second, even third or fourth pin all at once, but until you've set the first pin, you are still at risk of your turn ending. Here are 2 examples to show how the tool bonus works:
Example 1
I'm still player 1. It's early in the game, my Skill die is set to [1], so I won't get any bonus attempts. My tool die is set to [2], though, so I can work on 2 adjacent pins. I'm trying to pick player 3's Personal Lock that looks like this:
I roll two dice, one after the other. The order is important. The first die will be trying to match the 1st pin in the lock [5], the 2nd die will be trying to match the 2nd pin, [1]. I roll:
I set the first pin! Unfortunately I didn't set the 2nd pin, but as long as the first pin in the sequence is matched, my attempts reset & I get to move "deeper" into the lock. Again I roll 2 dice. With the first pin set, the first die will be trying to match the second pin in the lock [1] and the 2nd die will be trying to match the one after that [3]. I roll:
I matched on my second die! But - I failed to match the [1]. Because I can't move past that pin I can't move any deeper into the lock. My my turn has ended. However, I will still get XP for matching pins, and Player 3 will get 1XP for her lock surviving the attempt.
Example 2 (Adjacent Pins)
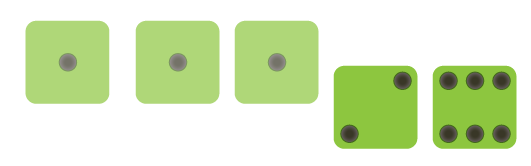
It's later in the game. My Skill die has come up to [2], so I get 2 attempts on each pin, and my Tool die is at a [3], so I can work on up to 3 adjacent pins on each attempt. I'm working on Player 4's Personal Lock. It looks like this:
I roll 3 dice, one at a time. I'm trying to match [3][2][4]. I roll:

I failed to match the first number, so that attempt failed, however, I did set the pin next to it, and I get an extra attempt because of my skill level. This time I'll only be rolling 2 dice, trying to match the first pin and the third pin. Our lock looks like this:
Note:
Keeping track of what pins have been set is important. An easy way to do this is to push the set pins slightly off line.
I can't try to pick the [5] because it is too far away from the first unset pin. My bonus of 3 means I can pick the first pin in the sequence and the two that immediately follow it, whether or not they are set. So, I roll only 2 dice, trying to match [3] and [4] and get:
Woo! I matched the first unset pin, so I can move deeper into the lock. I failed to set the [2], but that's ok, because my attempt succeeded so I can keep rolling. Our lock now looks like this:

So, I'm trying to match [4][5][6] with the 3 dice I'm allowed to roll. I roll:

Hot dog! I matched the first 2 unset pins. I didn't match the 3rd, but because this attempt was successful, my attempts reset, I can keep rolling and move deeper into the lock. The lock now looks like this:
Even though my tools let me manipulate 3 pins at once, I only have 1 pin left, so I'll only be rolling one die. On my first attempt I roll:
Nothing! I still haven't matched the [6], but I have 1 more try, and 1 die to roll. I roll:
YES! I matched the [6], and opened the lock! Player 3 will remove their Personal Lock dice (leaving behind the Challenge Lock Die they were attached to). They will not gain any XP, because their lock failed to defend against my attack and they will lose their next turn. I will get XP for opening the lock!
Note:
Yes! If your lock is picked, you lose your next turn. However, if yours is the last lock attached to the Challenge Lock, when your lock is picked, you will not lose a turn. In our 4 person game, that means that 3 of the 4 will lose 1 turn in the course of the game.
Picking Doubles:
Remember when I said "Order is Important"? It becomes especially important when 2 adjacent pins wind up having the same numbers. This game is meant to simulate lockpicking, and nothing makes a lockpickers life easier than pins of equal height. So, if you are picking against a line of dice that all have the same number, setting any one of them will set all of them. This can make opening some locks much easier than others.
Example:
As Player 1, I'm going to try to pick Player 2's lock, which looks like this:
That's a lot of 1s! My Skill die is set to [2] and my Tool die is set to [3]. I'll have 2 attempts against a sequence of 3 pins. So, with my first roll I'm trying to match [1][1][1], and if I match any of them, all of them will be set. I roll:
Yes! The [2] and the [4] didn't hit, but that [1] is good enough to set the first 3 pins in the lock. On my next attempt I'm picking against a lock that now looks like this:
So, I'll be rolling 2 dice:
Bah! I don't need 1s anymore. Useless. OK, let's go again:
Dang. Well, I didn't open the lock, but I probably scared the heck out of Player 2, and at least racked up some XP in the process. Player 2 will, of course, get their 1XP for a successful defense.
Note:
A player may not pick their own lock. If only their lock is left attached to the challenge lock, they simply have to wait until it has been opened to move on. They aren't losing a turn, though, so they will still accumulate 1XP for each successful defense of a rival's attack, and 1XP for their turn, even though they can't attack any lock. The person with the last lock standing does not lose their next turn when their lock is picked.
Picking the Challenge Lock:
Only when all of the locks have been removed from the challenge lock, players may begin to pick the challenge lock by the same process they used to pick each others locks. Whoever successfully picks the challenge lock first is the winner!
Want to make the game more challenging/realistic? Try these variations:
Difficulty Dice:
The more dramatic the variation of cut depths in your key, the more difficult the lock will be to pick. A short pin next to a long pin makes it difficult to set one without oversetting the other. So, to express the relative callenge of the varied pin heights, you can set challenge dice. Sum the height changes of your pins:
[1 to 1 = 0] [1 to 1 = 0] [1 to 2 = 1] [2 to 6 = 4]: Total variation = 5
With these numbers set, you can only use 1 die, and take 1 attempt against the lock until you beat the difficulty rating. You have to beat a difficulty check in order to use any advantages you might have from your Tool and Skill dice. You get to roll as many dice against the difficulty rating as your Tool die allows, trying to meet, or exeed, that number. So, for the first example lock, you could potentially beat the difficulty with a single die (with a 5 or a 6), but with the second one, you would need two (two 6s), and it would be a lot easier with three (three 4s).
You only get one chance to meet the difficulty per turn, but as soon as you pass, you don't have to test against it on subsequent turns. The max difficulty of a Personal Lock is 12 (2 x 6) and the max difficulty of the challenge lock is 24 (4 x 6).
Mixing in the difficulty rating changes incentives and strategies for who's locks you attack and when.
Over-lifting:
In lockpicking, when you lift a pin too high, it can be difficult to recover from. To represent the difficulty overlifting proposes, we can mix-in the overlifting mechanism.If you roll too low, you over-lift a pin, and your turn ends, regardless of how many attempts you had left.
The chances of over-lifting are determined by doubling your lowest skill. A pin is over-lifted when you lift below the value of the die you are attempting to match. So, if I am attempting to match a 5, and my lowest skill die is a 1, if I roll a 3 or lower, I have over-lifted that pin, and my turn ends immediately. If I am attempting to match a 5 and my lowest skill die is a 2, if I roll a 1 (lift = 4 in this case, so 5-4 = 1) I have overlifted and my turn ends. If I roll a 2, my turn continues as normal. Once your Tool and Skill dice are at a minimum of 3, you are completely safe from overlifting.
| Tool/Skill | Die Matched | Overlift if |
|---|---|---|
| 1 | 1 or 2 | Immune |
| 1 | 3 | Roll 1 |
| 1 | 4 | Roll 1 or 2 |
| 1 | 5 | Roll 1-3 |
| 1 | 6 | Roll 1-4 |
| 2 | 1-4 | Immune |
| 2 | 5 | Roll 1 |
| 2 | 6 | Roll 1 or 2 |
| 3+ | 1-6 | Immune |
Mixing in the Over-lifting mechanic changes incentives for the pace of leveling up your skill and tool dice and choosing which locks to attack and when.
Replacement Locks:
Each player has the opportunity to build a new lock once theirs has been picked. There can only be extra locks equal to half the number of players (rounded down) placed each game. If a player chooses to insert a new lock, they will gain no XP that turn, and they have to build off of a different die in the challenge lock than they did the first time. This means that games of 6+ players cannot add extra dice because they only contribute 1 die a piece to the challenge lock.
Mixing in replacement locks gives a player who is behind in skills or tools a chance to delay the attack on the challenge die, and gain some defensive XP in the process.
Rekey:
Spend 1 skill or tool point (decrement your die) to roll 1 die. You can then swap that die for any single die in any lock, including your own & the challenge lock. This is particularly useful if you want to alter the difficulty level of a lock, or break up a long run of matching dice. Once a lock has been rekeyed, if you are playing with difficulty levels, you should reasses the difficulty of the lock, and if it is higher than it was before, make each player roll new checks as though it were a new lock.
Want to make the game run a bit faster? Try these variations:
Start at 2:
Super simple, but just start everyone's Tool and Skill counters at 2 each. The early part of the game can be a slog as players advance to better skills and tools, but it can also lead to some exciting moments from lucky rolls and early differentiation, so skip those early rounds at your peril...but it'll save a lot of time!
Super D!
Gain extra XP if the player picking your lock fails to set any pins. If your lock survives completely unscathed, gain 2 XP instead of 1. This can help speed up those early rounds where matching a single die in a single attempt is less likely.